Master Colored Pencil with This Step-by-Step Demonstration
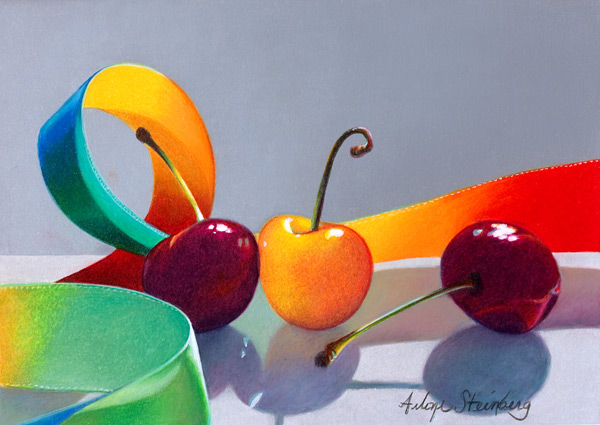
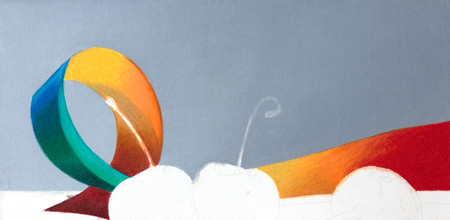
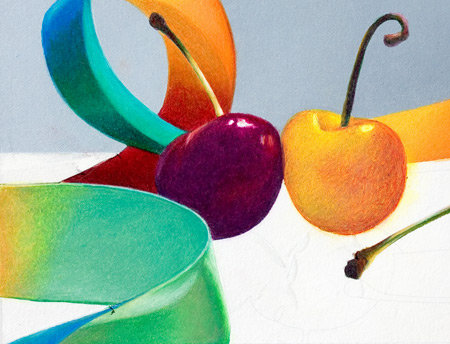
I could stare at the work of Arlene Steinberg all day. Her vibrant colors and use of reflections in her artworks are mesmerizing. Below, Steinberg demonstrates how she drew the eye-catching still life titled Ribbon Fantasy, above, using colored pencil. Enjoy!
Mastering Colored Pencil, Step-by-Step
Colored pencil is translucent, so as you layer and blend colors, those in the lower layers show through, allowing you to create luminous effects and subtle shifts of value and hue. This takes time, but working on a heated Icarus Art drawing board cuts the time drastically.
In this step-by-step demonstration, I identify Prismacolor Premier colored pencils with a “P” and Caran d’Ache Luminance 6901 colored pencils with an “L.”
1. Establishing the Background
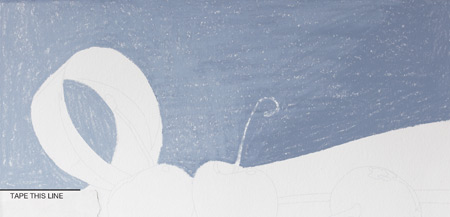
After transferring my compositional drawing onto the paper, I colored the curled stem white with Caran d’Ache Neocolor II water-soluble crayon. I then placed drafting tape along the line indicated in the image above to preserve the back edge of the table.
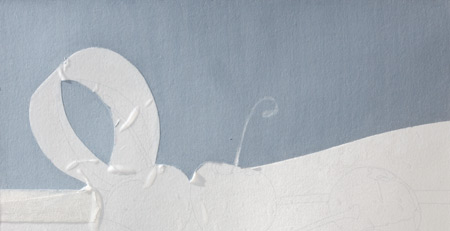
After this, I covered the entire drawing with a sheet of frisket film. Then, with an X-acto knife, I cut away the portion of the frisket covering the background. At this point, I taped my paper surface to the warm side of the Icarus board and turned the board to a low heat level — 1 or 2.
Using a circular scribbling motion, I colored the right side of the background with Neocolor II water-soluble wax crayons, using steel gray on the right and light gray on the left. I then loosely blended the colors by scribbling one on top of the other.
2. Blending the Grays
I turned the Icarus board to its highest setting (8). When it was hot, I placed a towel under my hand and blended the grays into each other with the side of a paper stump, using a circular motion. I didn’t have to press hard because the heat softened the crayon.
Starting my blending strokes on the frisket film and working upward kept the crayon from bleeding under the film. To finish the background, I then turned the drawing upside down and, working from the frisket down, I smoothed the Neocolor II background with straight up-and-down strokes of the side of the stump.
3. Starting the Layers
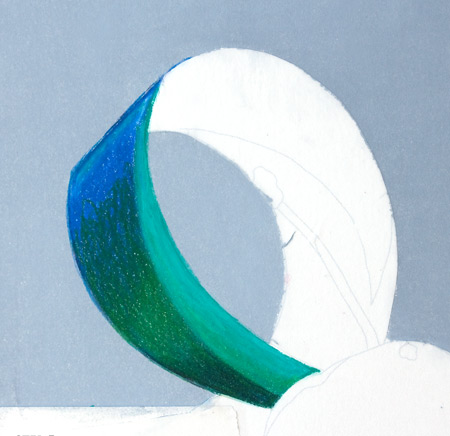
I cut away the frisket film on the left side of the ribbon loop. Reducing the Icarus board’s heat setting to 4, I applied colored pencil colors close to those of the actual ribbon: beryl green (L), dark English green (L), middle cobalt hue (L) and grass green (L).
I then darkened the bottom of the loop with black cherry (P). I lightened the green on the right side of the ribbon with canary yellow (P) and white (P), and blended beryl green into the green on the left side of the ribbon. I continued layering color until almost no paper showed in this area.
4. More Blending
With a colorless blender, I blended the ribbon colors on the left side of the loop, letting the heat from the board help. I then uncovered more of the ribbon by cutting away additional sections of frisket film.
Next, I moved my drawing to the cool side of the Icarus board and colored the stem of the cherry on the right in white (P). Moving back to the warm side of the board, I began layering colored pencil on the newly exposed areas of ribbon. Working from darker areas into lighter areas helps prevent the darker colors from migrating into lighter colors, so I went from crimson red (P) to scarlet lake (P) to cornelian (L) to orange (L) to apricot (L) to golden bismuth yellow (L).
To create shadows on the red areas of the ribbon, I layered black cherry (P) followed by a lightly applied complementary dark green (P), followed by crimson red (P). To create the shadows on the yellow and orange areas of the ribbon, I layered the complementary colors ultramarine violet (L) and gray-blue (L).
Over the lavender and blue, I layered more of the oranges and yellows. I blended lightly as I layered the colored pencil colors, and I continued layering until almost no paper showed in the area where I’d been working. Then, going from lightest colors to darkest, I once again blended with the colorless blender.
5. Coloring the Stems
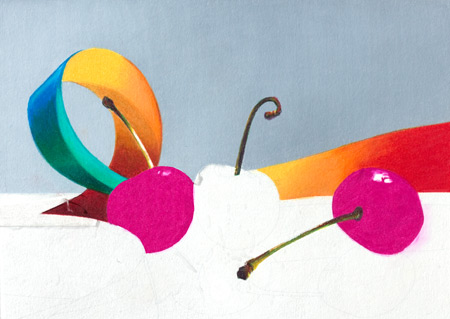
With an electric eraser, I removed the white pencil from the two stems on the left and cut the frisket film away from the left and right cherries and the third stem. I shaded the stems with black cherry (P) and dark green (P) colored pencil. The complementary hues help shade each other.
For lighter areas of the stems, I used green ochre (L) with touches of crimson red (P) and canary yellow (P). I left the lightest areas of the left stem white. I then lowered the Icarus board heat level to 2 and moved my painting to the cool side where I added white highlights to the exposed cherries.
Once the Icarus board had cooled to the setting of 2, I moved my painting to the heated side and applied Neocolor II purplish red to the cherries. I then turned the heat to the highest setting and blended the purplish red with a paper stump.
6. Shading the Cherries
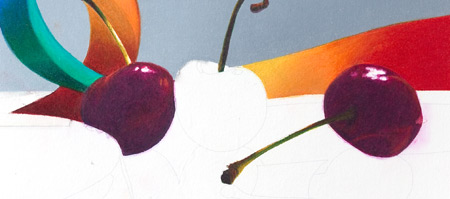
I turned the Icarus board up to level 4 and applied a layer of black cherry (P) colored pencil to the cherries. The lighter areas of the cherries received lighter applications.
Then, on the darker areas, I layered a complementary dark green (P) followed by indigo blue (P) in the very darkest areas. I continued layering colored pencil colors: more black cherry (P), plus black raspberry (P), crimson red (P), pumpkin orange (P) and, finally, canary yellow (P). I blended with a colorless blender, then I erased the white colored pencil highlights.
7. Applying Colors to Remaining Ribbon
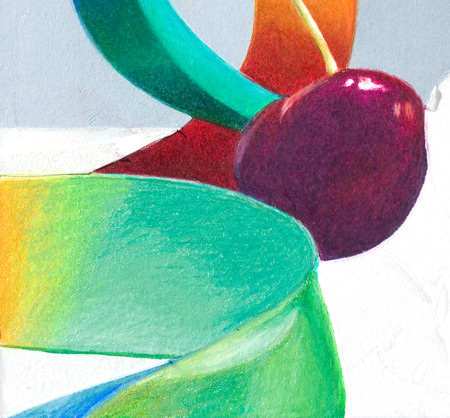
I cut away the frisket film from the remainder of the ribbon and began applying colored pencil in local colors: beryl green (L), dark English green (L), middle cobalt hue (L), spring green (L), grass green (L), and yellow ochre (P). On the shadowed areas I added touches of nectar (P).
On the shadowed areas, I added touches of nectar (P).
8. Working on the Highlights
Using a colorless blender, I blended the ribbon colors I’d just applied. Then I moved my painting to the cool side of the board and lowered the heated side to level 2.
I cut the frisket away from the middle cherry and colored its white highlights. I moved the painting to the heated side and applied Neocolor II yellow to the cherry. Then, with the heat turned to its highest setting, I blended with a paper stump.
Next, I lowered the heat level to 4 and layered yellow ochre (P) on the lightest areas, pumpkin orange (P) on the midvalue areas, and raspberry (P) on the darker areas. Following this, I layered crimson red (P) over the raspberry (P) and the areas I wanted to be lighter red.
In the red shadowed areas, I layered complementary kelp green (P) colored pencil. In the yellow shadow areas I layered complementary manganese violet (L). I then applied more yellow ochre (P), followed by canary yellow (P) in the lightest areas of the cherry.
9. Adding the Final Touches

To finish the yellow cherry, I blended with a colorless blender and erased the white pencil from the highlight. I then removed the rest of the frisket film and, with the Icarus board at level 2, I colored in the lightest areas of the table with Neocolor II silver gray.
I then layered Neocolor II light gray in the diamond shape between the red and yellow cherries. Next, I applied Neocolor II steel gray to shadowed areas on the table. With the Icarus board at its highest level, I blended the lighter table colors with a clean stump.
Using a fresh stump, I blended the shadow colors. I reduced the heat level to 4 and, when the board had cooled, added reflected colors to the shadows, using colored pencil colors I’d used in the cherries and ribbons.
To make the shadows interesting, I made sure I layered in complements, and I didn’t worry about going too dark because I knew my next color, cool gray 30% (P) would mute the values. Working on the cool side of the Icarus board, I added touches of red, yellow and turquoise colored pencil throughout the painting to give it additional “life.”
With my sharpened white pencil, I added some subtle stitching lines to the ribbons. To replace highlights, I added Neocolor II white to a little water in a watercolor cup and rubbed the white against the bottom of the cup until I had a creamy white liquid. With a small round watercolor brush, I touched up the highlights.
Having completed Ribbon Fantasy, I could sign it and spray on four to six coats of workable fixative, waiting several minutes between coats. And, there you have it!
This article first appeared in a past issue of The Artist’s Magazine. Peruse through past issues of the magazine for more art demonstrations, tips and techniques, advice and interviews, here.

would your coupon have a saving over the amazon price. If savings exist tell me whee I find the coupon. Save me time by sending it to my email.
I did oils in 76 and have a number of them hanging around my house. I have a lot of basic tools, including aacrylic pen set small line and broad which I hope to be able use to draw with them. They appear to be too opaque. My thought to drop some small drops of ink from one of the pens, you plunge them on the paper and out they come and mix those with water and brush and paint away.
I am at the very beginning of knowing what I am doing and am concentrating on basic shapes, perspective, and getting aquainted with the best media. I believe that is acrylic. I have a huge flower garden. I have around 65,00 images cataloged with Lightroom. These are high resolution. I do n ot want to habitually trace but want to draw free hand. I dable a little with shading and just purchased a set of blending tools,. Your big book books are a little pricy for me living as I do on SC and just getting out from under med bill with a stroke and severe back operation. I is amazes how my ability to see is growing. Laugh with m for a moment . My wife has a set of table mats with all kinds of olive branches with fruit, bottles and grape vines and I draw free hand from those one small simple sketch at a time.
Ben